I'm very excited about a change to the 'Inside the Customizer's Studio' series. In the past we've focused on longer interviews that debuted over a series of days. These have been fantastic opportunities and I enjoyed each and every one.
Since then, Ka.lego has launched his Ka-GO site and 'Behind the Build' interview series*. The concept is instead of finding inspirational builds and saying, 'Isn't this cool?' there's additional information provided through a discussion with the artist. I've blatantly stolen been greatly inspired by the concept and thought it would be a perfect way to bring more quality, original content to the site.
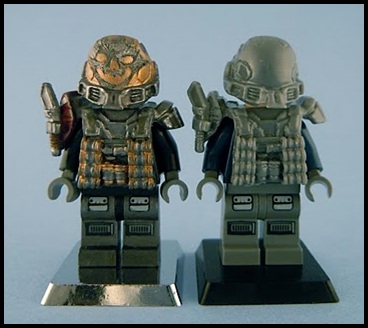
The first subject of the new format is a custom Emile minifigure that Andrew Pescovitz (Pecovam) had sent to me. The helmet and armor are produced by Hazel Tam and sold through United Armory. As you can see from the side-by-side picture above, Andrew has added Emile's signature skull design to the EVA helmet and a fantastic paint job. We start our interview here...

I remember on Flickr you mentioned that your hands were sore after working on several helmets. What technique did you use to create Emile's signature skull on the EVA helmet?
The technique I used for creating the skull was very simple. I took a regular exacto knife, and then took a smaller exacto knife blade with an extremely small and sharp point, and I fixed the smaller blade inside the larger holder and secured it in place. The larger holder for the blade allowed for slightly more control over my carving in my opinion. None the less, after about nine of them, my hands were really sore.

What type of paint did you use on the figure? Do you tend to add layers of paint or just have one coat?
I used two different types of paint on the figure. Mr. Color metallics and Citadel paints. On the majority of my figures, aside from ones I paint with camouflage, I try my best to keep the paint to three to four 'layers', I guess is what you would call it. Whenever I paint something, I am always thinking about the most efficient way to achieve the desired effect with the least amount of paint. This is also slightly money saving as well (lol). I always start with a base coat of a metallic color, and then go from there adding solids, weathering, battle damage etc. to make sure I can always achieve a realistic look to the best of my abilities.

There's an amazing amount of detail on the figure. How do you achieve such a clean look on such as small scale?
As for the cleanliness of the figure itself, I would chalk that up to two to three simple things. First, if you do something enough, you will eventually get better at it. I utilize paint on every single one of my customs in one way or another, practice makes perfect. Second would have to be my attention to detail, as well as my personal desire for everything I make to look as good as possible. If I paint something and it doesn't look as good as I can possibly do, I do it again, and again, until it's where I want it to be. Patience, a steady hand, and a knowledge of how your favorite brush and paints react to the surface of plastic and your strokes, eventually it will start to become second nature. Lastly, I would have to say the types of paints used make a big difference. I like to go with paints that dry extremely thin. This allows me to add a lot of color detail without filling in the detail on my parts.

It looked like you painted a pair of Space Police legs keeping the pockets and pads, or did you pant the legs and add decals?
I did actually just paint the space police legs around the pockets and left those in. This technique I actually got from a very good friend, Pedro. I saw him use this a few times in his photo stream and loved the way it looked. It adds a level of realism to the legs while maintaining the 'LEGO' look.
Did you use any 'new' techniques when developing the fig?
As for new techniques when developing this figure, I would have to say no. For a few reasons, when I make figures for myself to keep, I like to go all out. I like to go in all sorts of directions for modding in terms of how I like to make ball jointed arms for my figures, and such. When I make figures for other people, not to say I wouldn't try anything upon request, I try to keep a more 'LEGO' feel to the figure just because I know not everyone is all about the type of modding I do for my figures.
What was the most difficult part of the custom? What was the most fun?
The most difficult part of the custom and the most fun are actually one in the same. It was the skull. In terms of difficulty, making sure I did not scratch the raised portions of the skull for the mouth and eyes was a big challenge. But in the end, once you see the final product up close, it's very rewarding. As well as seeing how happy people were when I sent them out, including you.
A big thanks to Andrew for taking the time for the interview, and especially for the custom minifigure! I have more of these interviews planned for the future, so hopefully you enjoy the new format. In the meantime, you can see more of Andrew's work via his Flickr stream.
*If you've not been following the Ka-GO site/blog, I highly recommend it!