Chris McVeigh (Powerpig) is one of my favorite toy photographers, mostly due to the fact he often pulls the curtain back behind many of his complex shots to show how things were done.
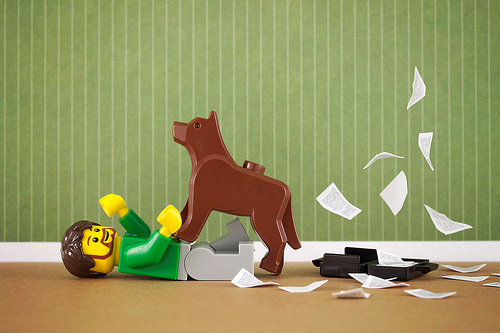
You may have seen his pictorial project this past holiday season taking each day of the LEGO City Advent calendar and creating a story and image around it. On day 10, he had a father being bowled over by the family dog, important papers flying through the air (shown above). There are likely numerous ways that one could achieve the effect, but try throwing paper up in the air and getting a crisp, clean picture to result (I'll wait...) So how did he do it?

Chris shows in this set up that he first took a picture of the room with papers suspended by a wires, sans doggy and daddy. Although he didn't go into great detail, he likely then took a second picture with the figures included but no papers. The two images were 'composited' together and further tweaked to arrive at the final result. A 'mask' was likely applied to merge the two images while removing the wires that held the papers. Masks can be applied in software packages like Photoshop or GIMP. You can likely find several tutorials how to do this on the interwebs.
Masks or masking can be used to create several visual effects. Do you want to show a Sith lord force choking a subordinate in mid-air. Masks can help do that. Do want to show your space marine bursting through a concrete wall, with chunks of concrete flying out? Masking can help there too. Whether you are using Photoshop, GIMP, or another piece of photo editing software there should be plenty of tutorials to watch on the web.
You can check out more of Chris' photos on his main Flickr stream, and more behind-the-scenes secrets on his set up page.